- Services
- 3D Gallery
- View-Master
- Software
- Lenticular
- Anaglyph
- Stereogram
- All Products
- Browse Categories


Determining the "Lens Pitch"

Note: You will need the Quicktime plugin to view this tutorial.

Before any images can be interlaced it is critical that the pitch of the lens be established and be calibrated to the printer and the medium that the image will be produced with. The importance of this process cannot be overemphasized.

Using FlashBand Generator
FlashBand Generator is the best friend you have. This simple program will save you hours and hours of work, lots of money, and quite a few gray hairs. Learn to use FlashBand Generator, and read a pitchcheck file and your quality of life will improve instantly!

The FlashBand Generator program has a fairly extensive help menu. It is important that you read this and learn how to make a pitchcheck file using FlashBand Generator.

This tutorial starts with a finished PitchCheck file produced with ProMagic's FlashBand Generator.


Printing the PitchCheck File


All images and the pitchcheck file should be run on the printer (any printer) in the direction that gives you the highest resolution and the best consistency and repeatability. For inkjet printers this would mean that the lenticules (lines of the pitchcheck) feed in and out of the printer. This allows the head of the printer, which is controlled electronically, to position the ink particles, and establish the most accurate spacing of our lenticules. If we run the image the other direction we would then be dependent upon the roller and gear mechanism of the printer to space our lenticules... which is not nearly as accurate and would result in an very poor lenticular print.

Although this is shown on a small inkjet printer, the same principles apply for large inkjets, Lambda, Lightjet and more.

Establish the best direction to have your images printed and stick to it. No matter if you are printing 3D lenticulars, flips, morphs or animations... vertical or horizontal... always position the image so the spacing of the lenticules are not dependent upon roller, or mechanical feed mechanisms. Rotate the image to fit this format if necessary.


Determining the Pitch
Now 
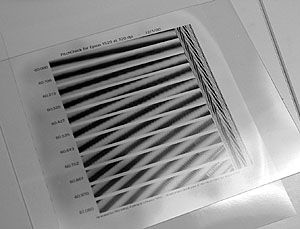
that we have a print of a series of eleven slightly different pitchcheck strips, we need to determine which strip will match our lens.

Lay the print on a flat surface, and lay the lens on top of the print. If the lens will not lay flat, then set a heavy piece of flat glass on top of the lens.

Align the lens to the print by looking at the vertical stripes on the right side of the image.

By examining the lines on the right side of the print, you can determine when the lens is perfectly aligned to the print.

This is not properly aligned...

Nor is this..

Now we're aligned.

Once properly aligned it becomes apparent that many of these pitch strips are not going to work. They are banded and it is obvious that these will be eliminated.

Actually there will be only one, or perhaps two lines that will work.

WE ARE LOOKING FOR THE LINE THAT "FLASHES" FROM BLACK TO WHITE!

Dragging the movie control of the above Quicktime movie, left and right, will simulate what you would see with this pitch check file by moving your head left and right. Notice that I find it easier to view these with one eye closed. Move very slowly and pay very close attention to both the left and right sides of the image. We need to find one strip that flashes from black to white entirely... all at once. It doesn't roll... it doesn't crawl... it flashes or flips. Although these all turn white and all turn black at one moment or another... they don't all flash.

Only the fifth line from the top does what we want... this would be our pitch... for this lens... on this printer... on this material... today!

It may all change tomorrow.


TIDBITS:

Sometimes when running an initial pitch check file you will find that none of the strips work.

Identify the pitch of the line that is closest to working, or has the fewest bands, and run another pitch check in that range. It's not unusual to have to run 3 or 4 FlashBand files to establish a pitch for an unknown lens.

Look for the area where the bands cross each other as you move your head left/right. If some bands are moving away from your eyes, while other bands are moving with your eyes... the pitch you want is somewhere in between these.

If the dark bands move with your eyes... the pitch number is too big

If the dark bands move away from your eyes... the pitch number is too small.

The wider the strip you make... the more accurate the pitch can be determined.

The tighter the "range" you use with FlashBand Generator... the more accurate your pitch will be.

Always make the pitch check strip at least as wide as your image... if not wider.

The bands indicate how many lenticules the pitch is off by.


Lens Pitch & Alignment


New Vision Technology
601 2nd. Creek Drive
Incline Village, NV
89451
775.832.8360


home  products  services  about us  contact